5.2. Import a database
The database import process, or reverse engineering as it is commonly known, consists of reading the information about all database objects stored on the system catalogs (pg_catalog.* and information_schema.*) and, based on these details, generating a reliable database model.
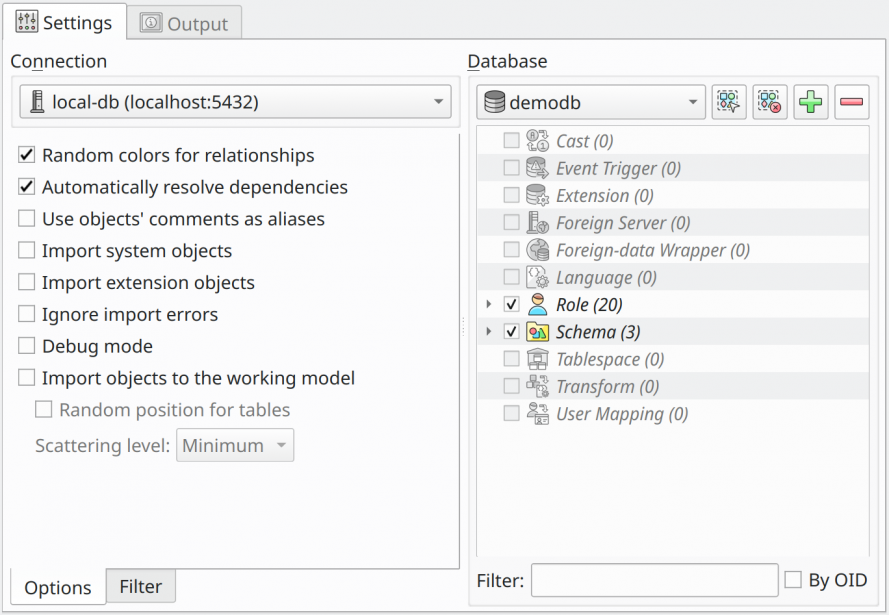
This process works quite well in pgModeler even being experimental but sometimes, depending on the database structure, this process may fail. But, fortunately, some workarounds can be used to create almost all database objects without problems. The image below shows all available options in the import dialog and their details in the following table.

| Field/Option | Description |
|---|---|
Connection |
Previously configured connection used as the communication channel to the server. It is important to remember that the user configured in the selected connection must have the needed permissions to query the system catalogs, or the process will certainly fail. |
Random color for relationships |
Random colors will be assigned to imported relationships, facilitating the identification of links between tables, mainly in large models. |
Automatically resolve dependencies |
Try to resolve some of the object's dependencies by querying the catalog when a needed object does not exist in the loaded set. In some cases, it's necessary to combine this option with the others below. This option does not apply to database-level objects like role, tablespace, and language, as well as data types and extensions. |
Import system objects |
Enables the import of system built-in objects. It's recommended to select only those objects that are directly referenced by the ones to be imported. It's important to note that trying to import a huge set of system objects can bloat the resultant model or even crash pgModeler due to memory/CPU overuse. |
Import extension objects |
Enables the import of objects created by extensions. Generally, there is no need to check this option, but if there are objects in the database that directly reference this category of objects, this mode must be enabled. |
Ignore import errors |
pgModeler ignores import errors and will try to create as many as possible objects. By checking this option the import operation will not be aborted but an incomplete model will be constructed. This option generates a log file on pgModeler's temp directory. |
Debug mode |
All catalog queries as well as the created objects' source code are printed to standard output (stdout). |
Import objects to the working model |
Creates all imported objects in the current working model instead of creating a new one. This is useful to create several objects from another database in the current model. The option will be enabled only when at least one database model is being handled on the Design view. |
Random positions for tables |
When checked, this option causes the imported tables to be placed in random positions without changing the positions of the objects previously existing on the model. If this option is unchecked, all tables will be placed at the position (0, 0). |
Scattering level |
Determines the amount of space used to scatter the tables in the canvas, increasing the distance between them. |
Database |
This set of fields lists all available databases on the server. The tree view right below the database listing is used to organize the objects directly linked to the selected item above. This view is automatically updated whenever the user changes the working database. |
Filter |
The user can use this to filter the tree view elements. As the user types the name of objects, the view is updated. This is useful when you intend to import only a subset of objects and don't remember where exactly the objects are in the database, so you can filter them by name and select the occurrences as they appear. |
By OID |
This is a modifier for the Filter field. When checked, this option causes the filter to match elements on the tree view by the OID (object identifier) instead of the object's name. |
Command buttons |
The four command buttons at the bottom of the Database group are respectively used to select all objects on the tree view, clear the current object selection, expand all items, and collapse all items. |
To start an import process, you first need to select the connection to be used to establish a new communication to the server. Once connected, all available databases will be listed in the combo box in the Database group. Select the desired database and wait for the tree view to be updated with the database objects. Define the desired import options and click Import. The process can be a bit slow depending on the number of objects to be imported. Once finished, the dialog is automatically closed, and the generated database model is loaded.
5.2.1. Reverse engineering filters
The object filtering in the reverse engineering dialog allows the user to provide filtering patterns that force pgModeler to list only those items matching the defined criteria, importing only a small subset of the database. This feature comes in handy mainly when you need to work with a few objects that reside in a huge database, avoiding the importing of the entire set of objects.
In older releases, the user was able to work with subsets of the database, but there was a need to list all objects first and then select only those to be imported. This could consume unnecessary time. By design, reverse engineering is not a quick operation since it demands lots of queries on the PostgreSQL's system catalog, and depending on the size of the database those queries can take a lot of time to retrieve all object information, list them on the tree, and only after that allow the user to select the desired ones. So, thinking of optimizing this process of listing and selecting objects, the filters were introduced.
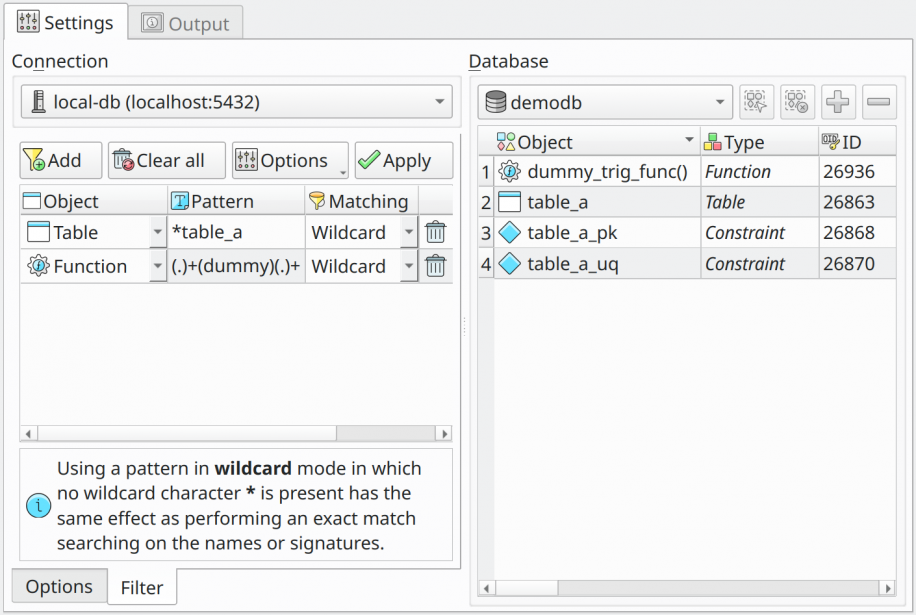
The image above shows the demodb database containing ~50 objects. So listing everything first before selecting only those objects to import would be a waste of computational resources and time. So, here's where the filters enter. In the image below, there are two filters specified, and once applied, they could retrieve only 4 in just a small fraction of the time that it could take to bring all the objects, thus selecting only a few. The available controls and options of the filtering widget are detailed below.

| Field/Option | Description |
|---|---|
Add |
Add a new entry in the filters grid. |
Clear all |
Remove all filters already configured. To individually erase a filter, click the icon |
Options |
This button toggles the popup menu with options to tweak the filtering. The available options are Match by signature, Only matching, and Forced filtering. |
Apply |
This button applies lists only the objects matching the filters in the grid inside the group Database. |
Match by signature |
This option, checked by default, causes the patterns to be matched against object signatures instead of their names only. The signature of an object is composed of the schema name (if applicable), the name, and the parameter data type (only for objects that handle parameters like functions and procedures). So, examples of signatures could be schema.table, schema.function(param_type, param_type1) and so on. |
Only matching |
This option causes objects strictly matching filters to be listed. |
Forced filtering |
This one is a special filter option that causes table children objects (constraints, indexes, triggers, rules, and policies) to be listed when there's the presence of at least one table/view/foreign table filter. This is useful, for instance, when you need to import just a small set of tables and their peers (defined by foreign keys). It's important to say that this special action is taken only for the tables matching the filters. Clicking the button will raise a menu containing the child types that you want to force the listing. |
In the filters grid, the column Object indicates the object type that the filter in that row applies to. The Pattern column is a string that is matched against the object names or signatures. The Matching is the mode in which the pattern is compared with the names and signatures. There are two possible modes: Wildcard and Regexp. Basically, the matching modes are the indicators of what SQL matching will be performed when querying the system catalog. The Wildcard operates similarly to the LIKE operator in SQL, but instead of a% for wildcard character, we use a *. Finally, Regexp is the alias to the regular expression matching operator ~*. It's important to note that all comparisons are case insensitive.
System catalogs
https://www.postgresql.org/docs/current/static/catalogs.html