2.1. Basic fields
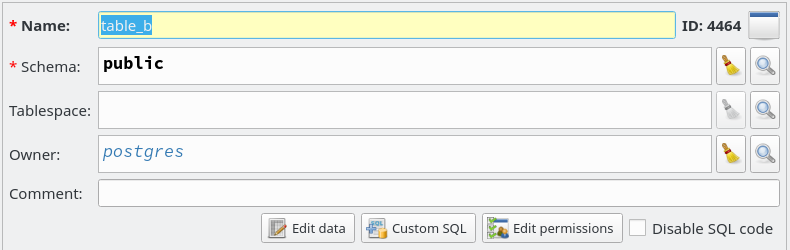
In almost all editing forms we have common fields like the ones shown in the image. Basically, the fields name and comment are present in all forms and the rest will be visible depending on the type of the object being handled. Bold field names with a red asterisk indicate required attributes and the user should inform values for them otherwise the code generation will fail.
The field name obeys the PostgreSQL rule for object naming (63 bytes long names). The only exception here is for cast and operator objects. For the first the name can't be assigned by the user because pgModeler is responsible to automatically generate the object's name and for the second a special rule must be followed: operator names should be composed by one or more of the following characters +-*/ <> =~!@#%^&|‘? (details at PostgreSQL documentation).
You can use some special characters in the middle of the object's name but bear in mind that in some cases it'll trigger the automatic identifier quotation mechanism to correctly identify the objects in the SQL code. An important note about objects' naming is that pgModeler does not fully support the quoted identifier notation. When using quoted identifiers only the following characters are accepted in the middle of names: a-z A-Z 0-9 _ . @ $ - / \ space.
The fields schema, tablespace, owner are object pickers, which means that the user can't manually input the name of the desired object. This kind of field is very common throughout the pgModeler's editing forms and in order to select the desired object the user must click ![]() to show the object selection dialog (as seen in the next image - details about this dialog can be seen on Chapter 6: Advanced tools). In order to clear the field just click the button
to show the object selection dialog (as seen in the next image - details about this dialog can be seen on Chapter 6: Advanced tools). In order to clear the field just click the button ![]() .
.
Continuing to describe the basic fields of the first image above we also have the buttons Edit data (only for tables), Custom SQL, Edit permissions and the check box Disable SQL code. The first button is used to add initial data to a table which is converted into INSERT commands during the generation of SQL code. The second button appends or prepends arbitrary DDL or DML commands in the object's SQL definition (details in section the Custom SQL commands, further in this chapter). The third one is used to create custom permissions for the object (more details can be seen in section Permissions at Chapter 3: Database objects). Finally, the option Disable SQL code can be used to deactivate the generation of SQL code for the current object (and for its references if the user confirms the displayed message box), this is useful when you need to create an object only as a reference to others and then at the moment of exporting the model to SQL all DDL commands related to that object will be generated but they will be disabled through SQL comments.
Another control that the users will often see in pgModeler's dialogs is the object's table or grid. This widget works as a regular data grid and its features are described below. The available control buttons and columns may vary depending on the kind of object being handled by the widget.
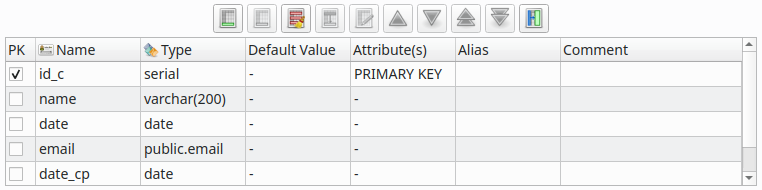
The first two buttons ![]()
![]() are used respectively to add or delete items from the grid and they can be triggered with shortcuts
are used respectively to add or delete items from the grid and they can be triggered with shortcuts Ins and Del. The next button is ![]() and its function is to erase all items from the grid, the shortcut for this button is
and its function is to erase all items from the grid, the shortcut for this button is Shift + Del. The next item (not listed in the image above) ![]() is the update button and its behavior may vary from dialog to dialog but basically it will do updates in the object's attributes when clicked or the shortcut
is the update button and its behavior may vary from dialog to dialog but basically it will do updates in the object's attributes when clicked or the shortcut Alt + R triggered. The duplication action, denoted by the icon ![]() , which shortcut is
, which shortcut is Ctrl + D, causes the selected item(s) to be duplicated in the grid. The button ![]() is used to activate the editing on the selected element and it can be triggered by the shortcut key
is used to activate the editing on the selected element and it can be triggered by the shortcut key Space.
There are also four moving buttons ![]()
![]()
![]()
![]() . The first two single arrow buttons, activated respectively by
. The first two single arrow buttons, activated respectively by Ctrl + Up and Ctrl + Down, are used to move one row up or down the selected item in the grid. The last two double arrow buttons, can be triggered by the Ctrl + Home and Ctrl + End and their actions are to move the selected item to the first or last row of the grid. Finally, the button ![]() when activated causes all the columns to have their width adjusted the contents size.
when activated causes all the columns to have their width adjusted the contents size.
PostgreSQL identifiers syntax
https://www.postgresql.org/docs/current/sql-syntax-lexical.html#SQL-SYNTAX-IDENTIFIERS